Mastering the Art of Peyote Stitch: A Comprehensive Guide

Peyote stitch, an ancient beadwork technique, continues to captivate artists and jewelry enthusiasts with its versatility and timeless appeal. This comprehensive guide explores what peyote stitch is, delves into its history and origin and provides step-by-step instructional videos on how to master this intricate beading method.
As you become more comfortable with basic peyote stitch, you can explore advanced variations such as odd-count peyote, two-drop peyote and even circular peyote to create more intricate designs. Click the following links to jump to each video and step-by-step instructions.
What is Peyote Stitch?
Peyote stitch, also known as the gourd stitch, is a beadwork technique used to create beautiful and intricate patterns by weaving together small cylindrical or tubular beads. This technique is named after the peyote cactus, as the stacked rows of beads resemble the cactus's segmented appearance.
History and Origin
Peyote stitch has a rich history that spans centuries and cultures. It can be traced back to Native American tribes, particularly the Huichol people of Mexico and the Native American Plains tribes, such as the Lakota Sioux and Cheyenne. For these indigenous cultures, beadwork was a significant form of artistic expression and storytelling.
The use of peyote stitch in Native American beadwork dates back to pre-European contact, and it played a vital role in tribal ceremonies, clothing, and regalia. Each tribe had its distinct style and motifs, making their beadwork a unique reflection of their culture and heritage.
In the late 19th and early 20th centuries, as European settlers and traders introduced glass beads to Native American communities, beadwork techniques evolved. Peyote stitch became increasingly popular due to its adaptability in creating intricate geometric designs and patterns.
Today, peyote stitch has transcended its cultural origins and is embraced by artists and jewelry makers
worldwide. Its enduring popularity is a testament to the beauty and craftsmanship this technique offers.
Getting Started with Peyote Stitch
Materials You'll Need:
- Seed beads: These small, cylindrical beads are the primary components of peyote stitch. They come in various sizes, colors, and finishes.
- Beading thread: Strong and flexible thread, such as nylon or FireLine®, is essential for weaving the beads together.
- Beading needle: Use a thin, flexible needle designed for beadwork.
- Scissors: To cut the thread.
- Clasp or closure (if making jewelry): You'll need a clasp or closure to finish your peyote stitch project.

Begin your creative adventure with seed beads today by mastering the essential techniques of peyote stitch. Join Rose in this step-by-step video tutorial as she guides you through the process.
Peyote Stitch Starter Tips
Step 1
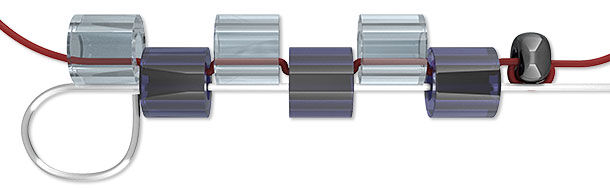
Cut an approximately 4-inch length of wrapping wire. Form a wrapped loop on one end of the wire, then use a wire straightener to straighten the remainder of the wire.
Step 2
String the desired number of seed beads for the first row ONLY onto the straight end of the wire.
Step 3
Cut the desired length of thread, then thread a beading needle almost doubling the thread. Place a stop bead on the end of the working thread, by stringing one #11 seed bead onto the needle then sliding it to the end of the thread, leaving an approximately 10-inch tail. Pass back through the seed bead in the same direction, securing the bead in place.
Tip: Adding a stop bead to your thread will help keep your first row of beads in place and prevent them from falling off the end of your thread. Be sure not to incorporate your stop bead into your beadwork.
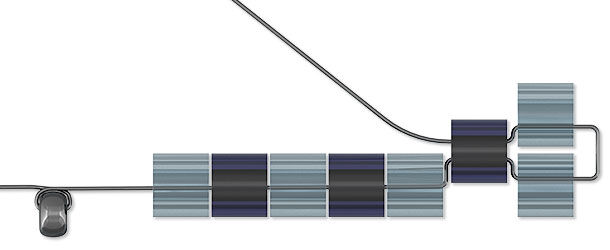
Step 4
String one seed bead, then pass through the first bead on the wire.
String an additional seed bead, then pass through the second seed bead on the wire. Repeat to add additional seed beads, passing through each of the remaining seed beads on the wire.
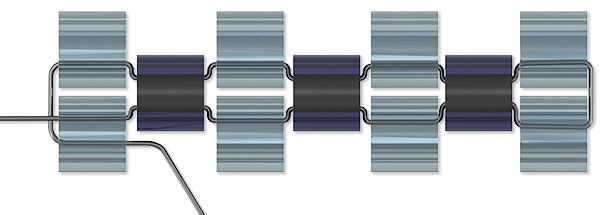
Step 5

Flip the wire over, then continue to add a third row, stitching through each bead in the second row (not on the wire). Repeat to create a total of six rows, then secure the thread.
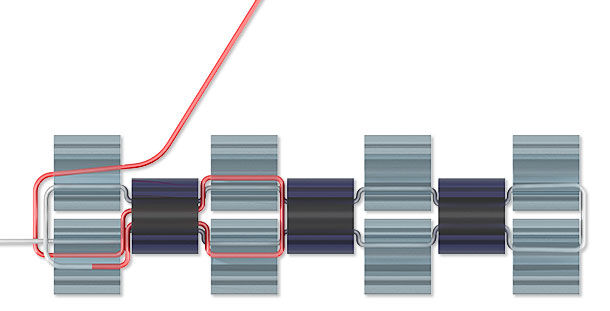
This creates a frame that allows you to easily begin working new peyote stitch designs from, using this frame as a base section. Then simply separate the starter strip from the finished design and secure the tail.
How to Create an Even and Odd Count Peyote Stitch

Even Count Peyote Stitch
Step 1
Cut an approximately 3-foot length of size D red Nymo® thread. Thread a #10 beading needle almost doubling the thread (to make it easier to work with) but leaving a tail so you are working with only one thread. Place a stop bead on the end of the working thread by stringing one #11 seed bead onto the needle then sliding it to the end of the thread, leaving an approximately 10-inch tail. Pass back through the seed bead in the same directions securing the bead in place.
Note: Adding a stop bead to your thread will help keep your first row of beads in place. Be sure not to incorporate your stop bead into your beadwork.
Step 2
String six (or an even number of) #8 seed beads onto the needle, in the color pattern of your choice. Slide the seed beads down close to the stop bead. This is the first two rows.
Tip: Bring the thread around your index finger to keep them taught so they don't twist around.
Note:
- #8 seed beads are larger than the typically used seed bead and make it easier to see the technique
- The first few rows of basic peyote are the most difficult. It gets much easier once these rows are complete.
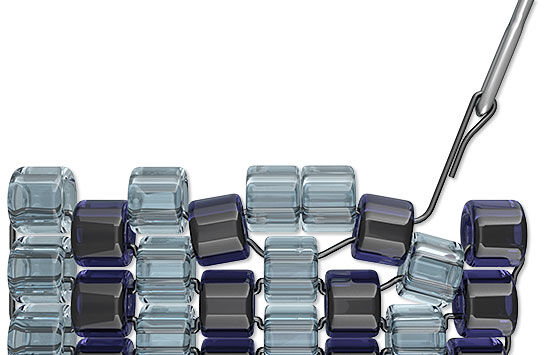
Step 3
.jpg)
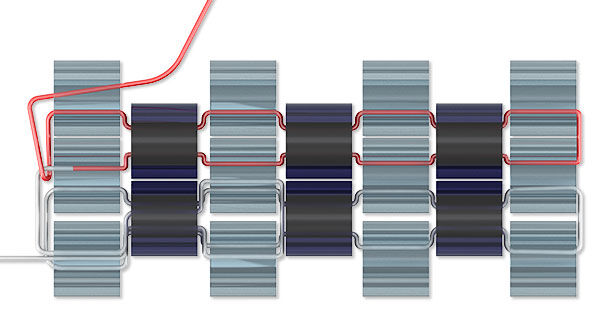
String an additional #8 seed bead, skip the previous seed bead then pass through the next bead in the row. Pull the thread so the last seed bead rests on top of the one next to it, beginning the next row. String an additional seed bead, skip a bead and pass through the next bead.
Continue the peyote stitch to the desired length.
Tip: Pass through the top of each bead so the needle doesn't pass through and catch previous thread.
.jpg)
Once the length is complete, pass through adjacent seed beads to create several loops to secure the thread in place then trim excess.
Odd Count Peyote Stitch

Embark on your seed bead creative journey today by delving into the fundamentals of the odd-count peyote stitch. Follow along with Rose in this step-by-step video tutorial.
Step 1
Cut one 5-foot length of thread.
Note: It may be necessary to cut additional lengths of thread later in the design.
Thread a beading needle almost doubling the thread (to make it easier to work with) but leaving a tail so you are working with only one thread. Place a stop bead on the end of the working thread leaving an approximately 12-inch tail.
Step 2
Begin the odd count peyote stitch by stringing an odd number of beads (typically seed beads) in the color of your choice.
Tip: The number of beads strung should be double the number desired in each row.
Continue to string one bead, skip the last bead in the previous row, then pass the needle through the next bead in the previous row. Pull the thread so the bead rests on top of the last bead in the previous row, beginning the next (third) row.
Continue the peyote stitch, skipping every other bead in the previous row. At the end of the row the needle will exit the second from the last bead in the previous row.
Step 3
String the last bead then pass the needle through the bead directly below it. Continue through the next two adjacent seed beads. Pass back through the seed bead directly above where you exited.
Continue down through the next two seed beads (diagonal) exiting the last seed bead in the previous row then pass through the first seed bead directly above it once more. Continue the normal peyote stitch.
Step 4
The next row will continue in the typical peyote stitch, exiting the last bead in the row. There is no need to repeat Step 3, just string a new bead then continue to stitch the next row.
Step 5
At the end of the next (fifth) row, instead of passing the needle through the bead directly below (Step 3), pass the needle through the loop of thread at the end of the previous row (instead of the turn-around technique in Step 3).
Step 6
Continue the odd count peyote stitch, passing through the loop from the previous row at the end of every other new row.
How to Create Increasing and Decreasing Even Count Peyote Stitches
Starting Peyote Stitch Pattern
Step 1

Cut a three yard length of Nymo®. Add your needle to the end first off the spool. Apply thread conditioner if you'd like. Add a stop bead to the end, leaving an 18-inch tail which will be used to attach the bracelet to the clasp later. Do not use this bead when working your pattern.
Step 2
Thread on six size 8/0 seed beads; bring them down to the stop bead. Begin the peyote stitch.
Step 3
Continue to work the peyote stitch until you have completed enough rows (for either a bracelet or necklace) minus the length the clasp will add. Remove the ''stop bead.''
Decreasing Peyote Stitch
Step 1
To decrease the end of an even-count peyote stitch, weave your peyote strip as long as you'd like or to the length your project instructions indicate.
Step 2
As your needle exits the last bead in the last row, weave it into the bead work, turning the needle around back in the direction it came. The goal is to weave through the beads, not over them, as you don't want to see the thread--it is not only unsightly but it will create an area of weakness in the design.
Step 3
With your needle facing the other direction, pass the needle through the last bead strung in the next to last row, then through the last bead strung in the last row. Pick up a new bead and pass the needle through the next 'popped up' bead in the row. Continue across the row.
Repeat Steps 1 and 2 until you've decreased as far as you'd like or as your project instructions indicate.
To end, weave your thread into the beadwork until the thread is secure. Trim any excess thread.
Increasing Peyote Stitch
Increase Along the edge of even count peyote

Exit the last bead in the previous row of the existing peyote stitch strip. String three seed beads then pass the needle through the first seed bead. Bring the seed beads down along the edge of the strip and position the beads so the two beads on the end sit on top of each other. (This is extending peyote by two columns and adding the first seed bead in the next row.)
Tip: The beads will want to twist when first added but will smooth into the design with additional rows.
String one seed bead then pass through the next up seed bead in the existing portion of the strip.
Continue the even count peyote stitch.
Adding beads to the center of peyote stitch
Exit the seed bead adjacent to where the increase will be added. String two seed beads then pass the needle through the next up seed bead. Bring the seed beads down into position between the beads. Continue the standard peyote stitch.
How to Make A Tubular Peyote Stitch

Tubular Peyote Stitch
Step 1
Cut a length of thread and add a needle to the end of the thread that is first off the spool. Thread a beading needle almost doubling the thread (to make it easier to work with) but leaving a tail so you are working with only one thread.
Note: Thread is woven in one direction. By placing the needle on the end first off the spool, the thread passes through beads and fabric easier.
Step 2

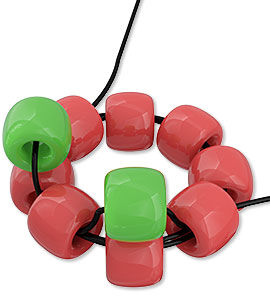
Thread on eight seed beads. Bring the seed beads toward the end of the thread, leaving a 6-inch tail.
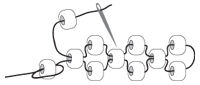
Step 3

Pass the needle through all 8 seed beads again, then through the first bead strung one more time. Pull the thread so the seed beads tighten up and form a circle. This is the base row.
Tip: It may be helpful to slide the ring onto a pen, pencil or seed bead tube to help with the formation of the design.
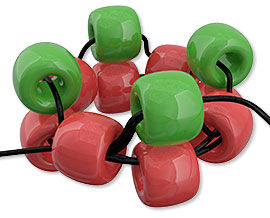
Step 4
String on one seed bead then pass the needle through the third bead in the row (skipping one bead from where your needle exited in Step 3). String one seed bead, skip a seed bead in the base row and pass your needle through the fifth bead in the row. Repeat this pattern all the way around the base row of seed beads, skipping a seed bead each time you add a new seed bead--working until you have added four seed beads.
Tip: If this is your first time doing a peyote stitch, please note that the beginning rows can be challenging. The pattern will become clear in the later rows.
Step 5
Pass the needle up through the first seed bead added in Step 4, this is called a step-up, and positions your needle and thread so you can begin the next row.
Step 6
Repeat Steps 4 and 5 until you've created a tubular peyote the length your design calls for.
Peyote stitch is a timeless and versatile beadwork technique that has a rich history and continues to inspire artists and jewelry makers around the world. Whether you're a beginner or an experienced beader, mastering peyote stitch opens a world of creative possibilities. So, gather your materials, follow the step-by-step instructions, and start weaving your own beautiful patterns with this ancient and captivating beadwork technique. View more resources and instructions for seed beading in Jody Young’s free seed bead embroidery series and Rose’s seed bead series. Learn how to make your own seed beaded toggle clasps to add a one-of-a-kind flair to jewelry.
Shop for Your Materials Here:


Have a question regarding this project? Email Customer Service.
Copyright Permissions
All works of authorship (articles, videos, tutorials and other creative works) are from the Fire Mountain Gems and Beads® Collection, and permission to copy is granted for non-commercial educational purposes only. All other reproduction requires written permission. For more information, please email copyrightpermission@firemtn.com.